Trimming Entities with PowerTrim
Use the PowerTrim command to trim multiple, adjacent entities by dragging the pointer across each entity.
You can also extend entities along their natural paths, and extend or trim two entities where they intersect at a virtual corner.
Consider the following:
- You can trim Lines, PolyLines, Arcs, Circles, Ellipses, Splines, Rays, InfiniteLines, Hatches, and Gradients.
- Trimmed Hatches maintain associativity with changed boundary entities, even if they are divided into different hatched areas. Divided Hatches remain as one entity, but you can use the EditHatch command to separate them into individual entities (dialog box option Create Hatch for each boundary). The same applies to Gradients.
- You cannot trim Dimensions, Notes, SimpleNotes, Regions, or entities within Blocks. But RichLines, Notes, SimpleNotes, Regions, and Block entities are recognized as cutting edges.
- When you trim at a wide PolyLine, the command trims at its centerline.
- On Sheets, you can trim at Viewport boundaries.
PowerTrim
To trim entities with PowerTrim:
- Do one of the following:
- On the menu, click Modify > Power Trim.
- Type PowerTrim.
- On the toolbar, click
 and select Power Trim
  .
.
- In the graphics area, click and drag the pointer over the entity to trim.
The pointer changes to  as it crosses and trims the entity. A trail is created along the trim path.
- Continue to press the mouse button and drag across each entity you want to trim.
- Release the mouse button when finished trimming.
- Press Enter.
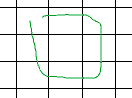
The pointer movement is shown in green. The result is on the right.
 Note: If you drag across an entity that does not intersect other entities, the entity is deleted. You can use this behavior intentionally.
To extend entities with PowerTrim:
- Do one of the following:
- On the menu, click Modify > Power Trim.
- Type PowerTrim.
- On the toolbar, click and select Power Trim .
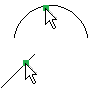
- Press Shift, then click in the graphics area next to the first entity, and drag across the entity to extend.
The pointer changes to as it crosses and extends the entity. A trail is created along the trim path.
- Continue to press the mouse button and drag across each entity to extend.
- Release the pointer when finished extending.
- Press Enter.
To lengthen and shorten entities with PowerTrim:
- Do one of the following:
- On the menu, click Modify > Power Trim.
- Type PowerTrim.
- On the toolbar, click and select Power Trim .
- Move the pointer to an entity so that the pickbox appears, then click the entity.
- Drag the entity to its new length, then click to fix the length.
- Press Enter.
To lengthen and shorten entities to boundary edges with PowerTrim:
- Do one of the following:
- On the menu, click Modify > Power Trim.
- Type PowerTrim.
- On the toolbar, click and select Power Trim .
- Move the pointer to an entity so that the pickbox appears, then click the entity.
- Specify another entity that acts as a boundary.
Note: This method lets you lengthen or shorten an entity to an invisible extension of another entity. Sub-entities of Blocks and References are recognized as boundaries.
- Press Enter.
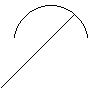
The pointer selections are shown on the left. The result is on the right.
Corner Trim
To trim entities with the Corner option:
- Do one of the following:
- On the menu, click Modify > Power Trim.
- Type PowerTrim.
- On the toolbar, click and select Power Trim .
- Specify the first entity to join on the side to remain.
- Specify the second entity to join.
- Press Enter.
Note: Depending on the entities and their relative position to each other, the software extends or trims each entity to join them. A message appears if the operation cannot be completed.
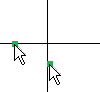

The pointer selections are shown on the left. The result is on the right.
Use the Undo option to cancel the most recent trim operation. You can use the Undo option repeatedly.
Command: PowerTrim
Ribbon: Home > Modify > Power Trim, and Modify > Corner Trim
Menu: Modify > Power Trim
Toolbar: Power Trim