Editing Table Cells
You can insert, delete, merge, or resize cells, rows, and columns in tables. You can modify the cells in place or use the EditTableCell command.
Table grips and cell grips provide additional means to modify tables.
To edit table cells:
- Select one or more table cells to edit them in place:
- Click a table cell
- or -
- Shift + click multiple table cells
- The selected cell(s) are highlighted and display with grips. Column and row headers appear.
- The selected cell(s) are highlighted and display with grips.
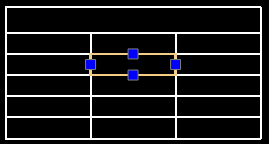
Also, the Edit Table pop-up toolbar appears.

- Use the left or right cell grip to adjust the column width of the selected column and the top and bottom cell grip to adjust the height of the selected rows.
- Use tools on the Edit Table pop-up toolbar to modify the table:
Note: Alternatively, you can access the commands by right-clicking selected cells.
-
| Tool |
Button |
Description |
| Insert Row Above |
 |
Inserts a row above the selected row. If you selected multiple rows, the same number of rows are inserted. |
| Insert Row Below |
 |
Inserts a row below the selected row. If you selected multiple rows, the same number of rows are inserted. |
| Insert Column Left |
 |
Inserts a column to the left of the selected column. If you selected multiple columns, the same number of columns are inserted. |
| Insert Column Right |
 |
Inserts a column to the right of the selected column. If you selected multiple columns, the same number of columns are inserted. |
| Remove Rows |
 |
Deletes the row(s) of selected cell(s). |
| Remove Columns |
 |
Deletes the column(s) of selected cell(s). |
| Size rows equally |
 |
Makes the selected rows of equal height. The total height of the table does not change. |
| Size columns equally |
 |
Makes the selected columns of equal width. The total width of the table does not change. |
| Merge cells (Flyout) |
 |
Combines selected cells. Specify whether to merge All, Horizontal, or Vertical. This option is not available if you select only one cell. |
| Unmerge cells |
 |
Separates selected cells that you previously merged. |
- Double-click a selected cell to add text.
Use the Note Formatting pop-up toolbar to edit table cell text.
- Click outside the table to finish editing.
To edit table cells with the EditTableCell command:
- Type EditTableCell at the command prompt.
- Specify a table.
- Specify a cell or a range of cells in the format An or An:An, where A stands for column indicator(s) and n stands for row number(s).
For example, C3 or B2:D5.
- Use command options (Insert, Remove, Size, Merge, and Unmerge) and sub-options to modify the table.
The options correspond to the Edit Table Cells pop-up toolbar options (see above).
- Specify the Exit option.
To edit table presentation using EntityGrips:
- Click a table guideline.
The EntityGrips appear.
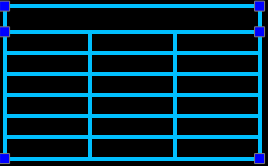
- Select EntityGrips to modify the table:
-
| EntityGrip Location |
Description |
| Upper left corner |
Moves the table. |
| Upper right corner |
Stretches the table horizontally. |
| Lower left corner |
Stretches the table vertically. |
| Lower right corner |
Stretches the table horizontally and vertically. |
| Top of columns |
Adjusts the column widths. |
- Click outside the table to finish modifying the table's appearance.
 Click table grips twice to move, rotate, scale, or copy entire tables (see Modifying with EntityGrips).
Command: EditTableCell
Menu: Modify > Entities > Table Cells