Setting Additional Options for Hatches and Gradient Fills
Setting Additional Options for Hatches and Gradient Fills
When defining hatch boundaries by specifying internal points, the command detects the entities that form the boundary. In this case, additional options allow you to control the automatic detection of boundaries.
You can do the following:
- Detect or ignore internal closed boundaries
- Keep or delete the initial closed contour used when the hatch was created
- Create hatch for boundaries with gaps
- Specify the set of entities to be analyzed for boundary detection.
Optionally, use the Origin and Transparency options to better display hatched entities.
To detect or ignore internal closed boundaries:
- On the Setting tab, in Mode, click on Options.
- In Internal Regions, click Find internal regions to detect internal closed boundaries.
- Click a hatch Display style.
- Out
 . Creates hatch patterns only in the outermost areas.
- In/Out
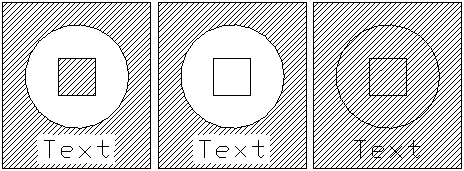
 . Creates hatch pattern between alternate areas, starting with the outermost area (default).
- Ignore
 . Ignores the internal structure and hatches the entire area. Hatch lines pass through text, block attributes, and 2D solids.
- Out . Creates hatch patterns only in the outermost areas.
- In/Out . Creates hatch pattern between alternate areas, starting with the outermost area (default).
- Ignore . Ignores the internal structure and hatches the entire area. Hatch lines pass through text, block attributes, and 2D solids.
The following diagram illustrates the In/Out, Out, and Ignore styles.
To set the hatch default origin:
- On the Settings tab, in Mode, click on Options.
- In Origin, specify the default origin settings.
- Use current. Uses the origin point for the hatching specified with the current Hatch command.
- Use source. Uses the origin of existing hatches.
To create hatch for boundaries with gaps:
 Note: If there are gaps between the entities selected for a boundary definition, the command does not create the hatch. However, you can define a gap tolerance so that the command ignores the gaps that are smaller than the defined value, considers the boundary closed and creates the hatch.
- On the Settings tab, in Mode, click on Options.
- In Gaps, specify a Maximum gap size. The command ignores the gaps that are smaller than the defined value, considers the boundary closed, and creates the hatch.
To keep the boundary used when the hatch was created:
- On the Settings tab, in Mode, click on Options.
- In Boundary preservation, click Keep boundaries to maintain the initial closed contour normally deleted when a hatch is created.
- From the Type list, select whether the boundary contour is created as PolyLine or Region
To specify the set of entities for the boundary detection:
- On the Settings tab, in Mode, click on Options.
- In Gaps, in Boundary group, do one of the following:
- Select Active View Tile to create a boundary group from all visible entities from the current viewport.
- or -
- Click
 to select entities for the boundary.
- Click
 to select entities for the boundary.
- In the graphics area, specify the entities and press Enter.
Note: If there are gaps between the entities selected for a boundary definition, specify a Maximum gap size. The command ignores the gaps that are smaller than the defined value, considers the boundary closed, and creates the hatch.
To specify hatch or fill transparency level:
- On the Settings tab, in Mode, click on Options.
- In Transparency, specify the transparency level of the hatch or fill:
- Use current. Uses the current transparency setting for new entities.
- ByLayer. Uses the current layer transparency setting.
- ByBlock. Uses the current transparency setting of a block, if the hatch or fill is contained in that Block.
- Specify value. Uses the transparency setting that you specify by either entering a value in the text box or using the slider. Specify a value between 0 and 90% where 0% means no transparency (opaque).
Command: Hatch
Menu: Draw > Hatch/Fill
Ribbon: Home > Draw > Hatch